
Queen Rearing using the Nicot System and Cloake Board
Podcast of Small-Scale Queen Rearing can be found -> Here.
 The following is the method I used for raising small quantities of queens. It uses a Nicot no graft system that I purchased from BetterBee. When I bought mine, the only directions that came with it were in French. Perhaps that has changed now, but it made for learning the do’s and don’ts the hard way. Hopefully the description of my method, that I have continued to refine over the years, will help you avoid the mistakes I have made along the way. Before you can start rearing queens, you have to select the donor queen you want to rear from. Selecting the traits of the hive you want to replicate is a personal decision and I will not go into that here. There is plenty of information on how and which traits to look for in a donor queen on the beekeeping forums. Another point to make mention of is the nomenclature I will be using. Instead of using day numbers I will use alphabetical letters to indicated each day and the steps required on that day. By not using numbers, the confusion between process day and queen development cycle is removed. Some folks like to use the day the egg is laid as day 0, which makes any steps prior to that referred to in negative numbers.
Equipment
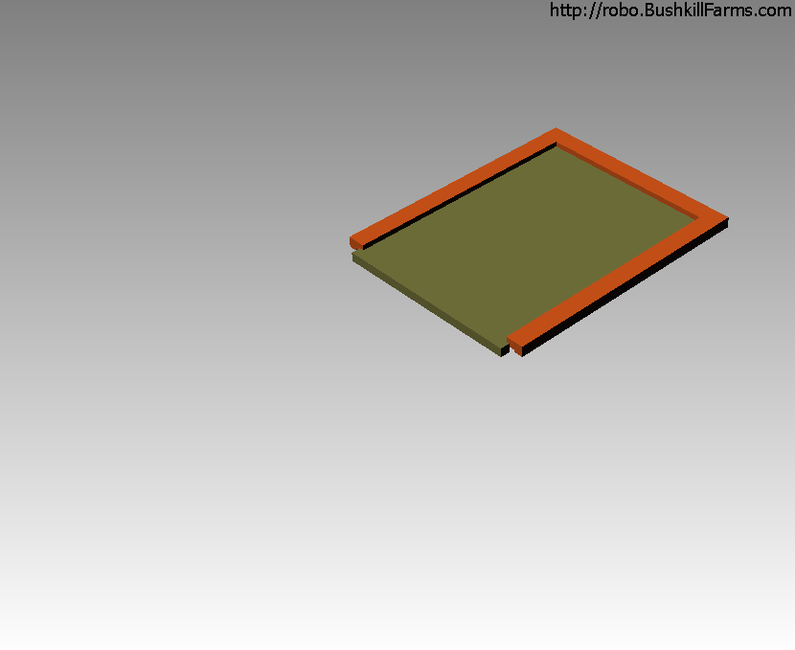
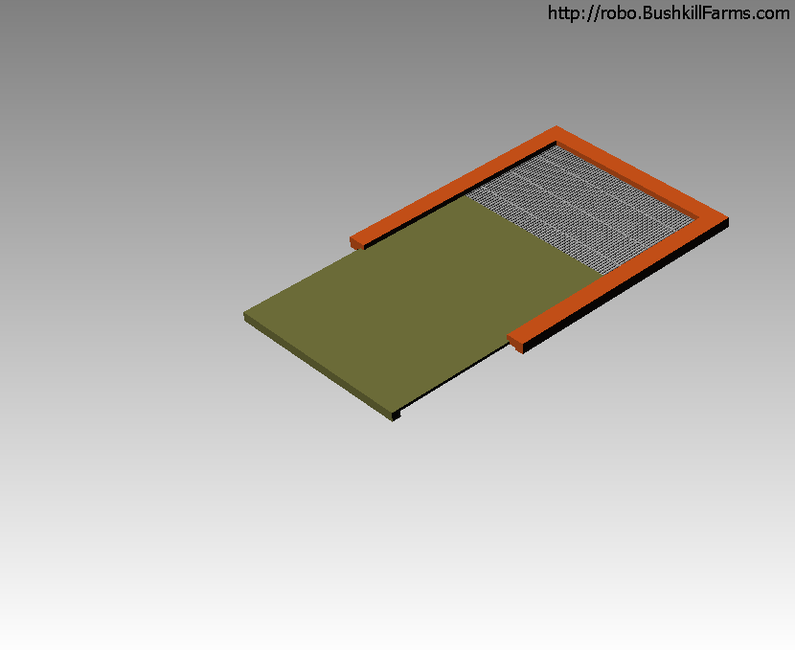
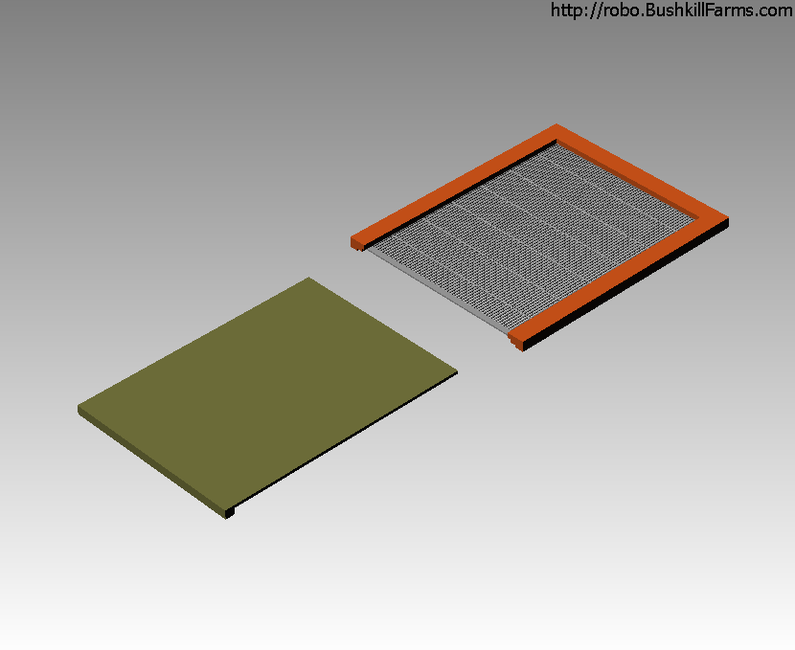
The only non-standard piece of equipment I use besides the no-graft kit is a Cloake board. The Cloake board is named after the New Zealand beekeeper, Harry Cloake, who developed the board and the method. With the use of a Cloake board, one can raise queens from one colony with minimal hive manipulations. The Cloake board is simply an excluder encased in a three sided shim that acts as a entrance. The board also has a slide in floor that covers the excluder and divides the hive into 2 separate colonies. This allows the one hive to be used as a queen-less cell starter and a queen-right cell finisher.
Process
Step A:
Install the brown cell cups into the laying box. Even if you only want to make a few queens, you must install a complete set of cell cups. If you do not, bees will find access to the back side of the box, get trapped, and die. With the clear plastic excluder removed from the laying box, the frame is placed in the middle of the brood area of the donor queen hive. This is an important step so that the laying box gets the hive’s “smell” and the bees can polish the cells before the queen is confined to lay in the box. The first time you use the laying box, you may want to leave it in the hive a couple extra days for cleaning. Once used, I find 24 hours sufficient for cleaning. If left longer, I have seen times where the bees will start storing nectar in the cups. If you don’t do this one day pre-clean, you will have mixed results with the queen laying in the cups and will end up with eggs/larvae of different ages.
Step B:
Install the clear plastic excluder on the laying box and place the queen in the laying area. Place the frame back in the center of the brood area of the donor queen hive.
Step C:
Check and see if the queen has laid eggs in the cell cups. If she has not, put the frame back into the hive and return in 24 hours and check again. If she has laid in the cell cups, remove the clear plastic excluder from the laying box and put the frame back into the hive. This releases the queen from the laying box and also makes access to the eggs easier for the nurse bees that will care for them.
Step D:
Wait
Step E:
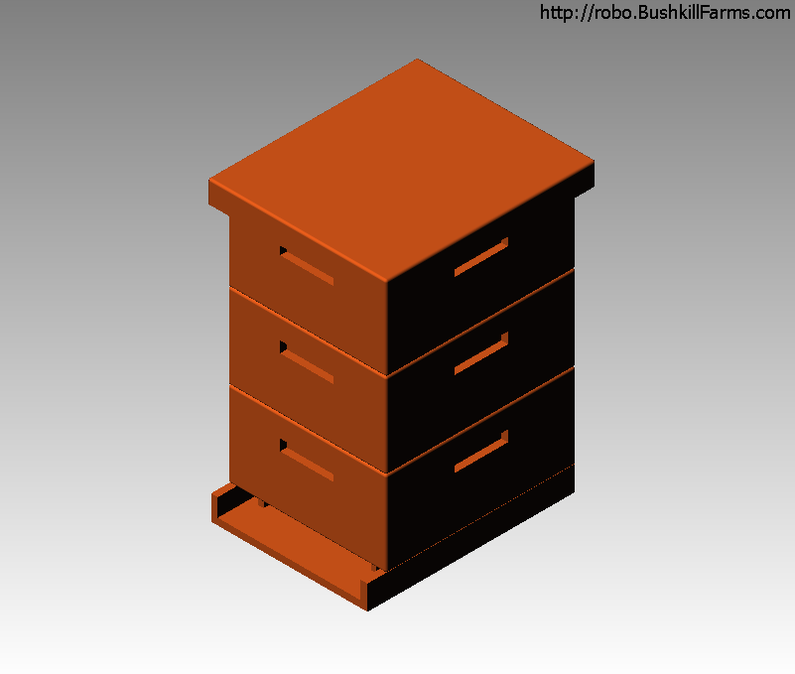
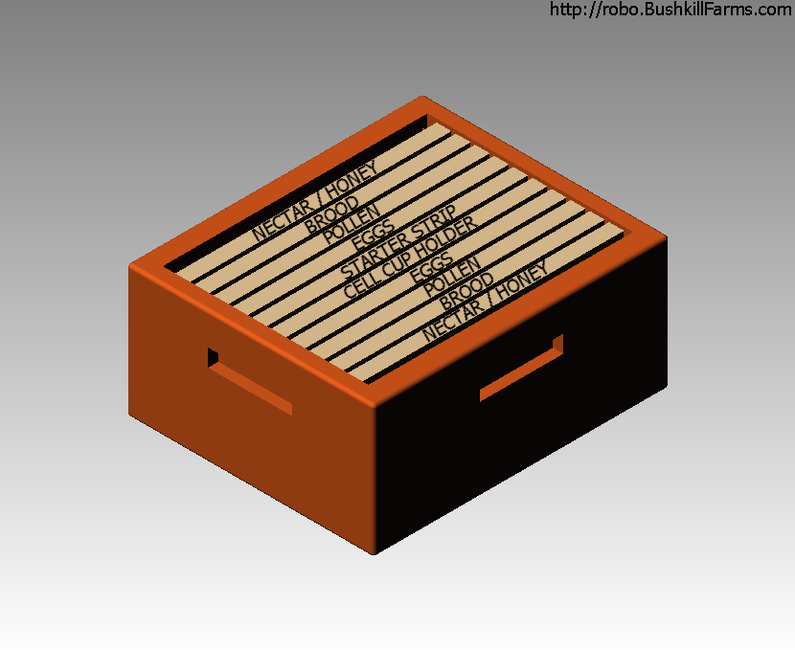
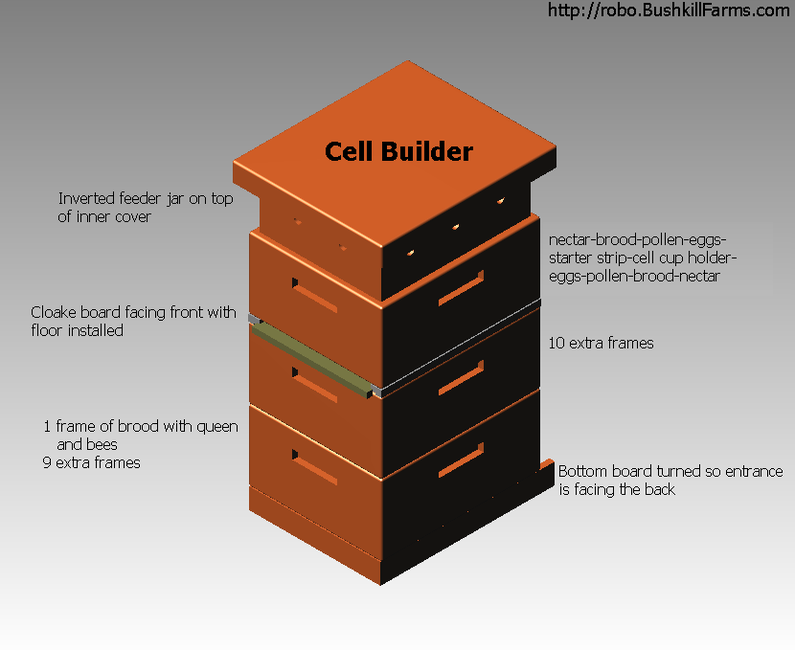
Setting up a cell builder is next. You want to select a strong, highly populated hive to make your cell builder from. The idea is to create a queen-less cell starter that has an abundance of resources so many quality cells can be created. Once the cells are started, you want a strong queen-right cell finisher to complete the cells. Start by tearing down the selected hive and locating the queen. Once the queen is found, place her and a frame of brood covered with bees in and empty brood chamber. Next create a cell builder chamber by placing the rearing frame in the middle and work towards the outside placing frames of eggs, pollen, brood, and honey in that order. A frame of foundation or starter strip can also be added to allow a place for comb building, otherwise you may find them building comb in the rearing frame and on the queen cells. Any frames still remaining from the original hive are considered “extras” when reassembling the hive. These extra frames should have the bees shaken into the previous assembled cell builder chamber before placing back in the hive. Turn the bottom board so that the entrance faces the rear, and place the brood chamber housing the queen on the bottom board. Fill out this brood chamber with extra frames and place another hive body on top with the remainder of extra frames. If you are using a hive that was just 2 brood chambers, the additional hive body is not needed. By turning the entrance to the rear, you have provided an entrance for the queen and the bees on the brood, but prevent any of the field bees in the cell builder chamber from returning to the bottom. Then place the Cloake board, with slide-in floor installed, facing the front of the hive. Place the cell builder chamber on the Cloake board followed by the inner cover, vent box or empty super, and the top. An inverted jar feeder is recommended above the inner cover once the rearing frame is filled with larvae.
Step F:
Remove the laying box from the donor queen hive and verify that the eggs have hatched. The presence of a shiny film of royal jelly is a good indicator. Retrieve the rearing frame from the cell builder and carefully remove cell cups with larvae from the laying box and install them in the rearing frame. This should be done in the shade and a towel should be placed over the rearing frame to reduce the chances of the larvae drying out. Return the rearing frame to the cell builder and provide an inverted jar feeder over the inner cover.
Step G:
Wait
Step H:
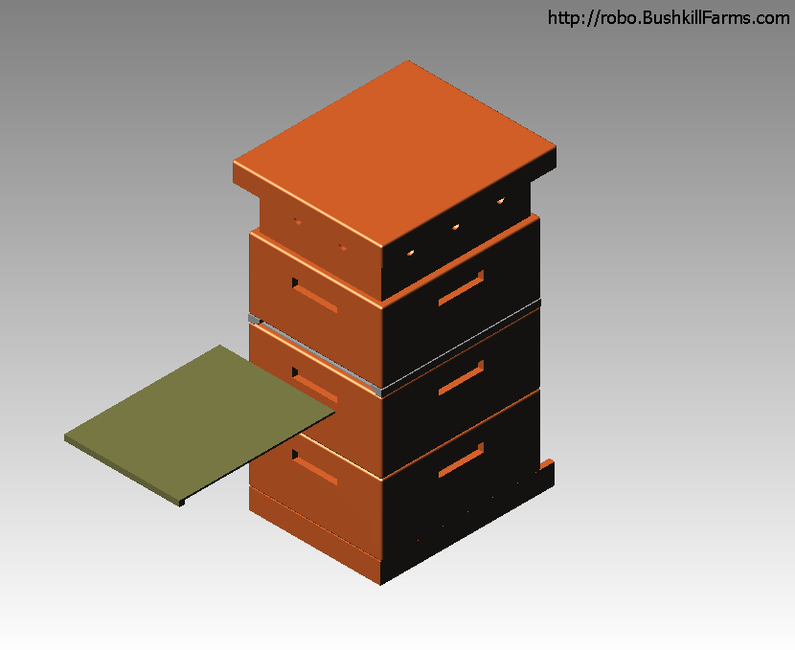
Remove the floor from the Cloake board to turn the queen-less cell starter into a queen-right cell finisher.
Steps I – M:
Wait
Step N:
If required, set up mating nucs.
Step O:
Move cells to mating nucs or install hair roller cages. If you are raising queens for replacement, you can move the cells right to the “introduction nuc” as explained in queen introduction.
Step P:
Wait
Step Q:
Queens hatch, may be a day earlier/later depending on weather.
Keeping Track
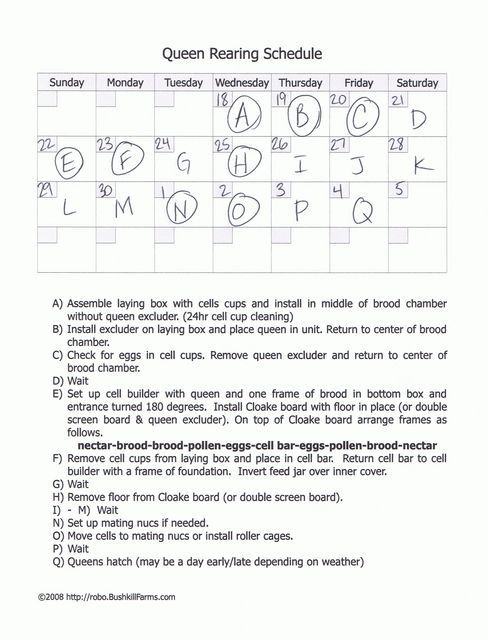 A Queen Rearing Calendar can be found in the reference section of our downloads that makes the tracking of the process much easier. I simply fill in the calendar dates in the upper left corner, and then proceed to put a letter in each box starting with ‘A’. I circle the letters that require intervention so I don’t miss doing something. Here is an example of a completed form.
![Not All Flowers Are Friendly: Honeybee vs. Milkweed [Must-See Video]](https://beevac.com/wp-content/uploads/2025/06/milkweed-blooms-1340941-400x250.jpg)

Rob,
Is there some way I can get a full size copy of your Queen Rearing Calendar? Incidently, David Eyre @ Beeworks has an outstanding video on the Nicot System. Thanks.
Roger
Roger,
A PDF version of the queen rearing calendar is available HERE.
David Eyre’s video on the Nicot system is indeed excellent. Parts of my process came directly from David’s teaching. I previously had a link to it here, but the Beeworks store kept changing and I gave up trying to keep the link working.
I am very much impressed by this Nicot system , can you let me how Nicot system differ from jenter method or are they the same?
Hi Robo, thanks for putting this up. I have been scrolling through pages on queen rearing and leaning towards a system, jenter or other and this is very very helpful. I saw somewhere else that perhaps the jenter system is no longer offered so may be buying a nicot system, and the queen rearing video endorsed by such heavy hitters as yourself I think and Michael Bush. I am in WV, waiting for a run of japanes knotweed to start and finish, thinking about rearing queens in August, dividing a medium 8 frame box to make 2 nuc’s overwintering them with maybe a queen excluder and food store above, as i don’t think a nuc will build up enough done this late ? Thanks, Chris.
Yes, I have heard similar concerns with the availability of Jenter parts.
dividing a medium 8 frame box to make 2 nuc’s overwintering them with maybe a queen excluder and food store above
Another option is to take the the last round of queens in the mating nucs and move them into 5 frame nucs with a sugar frame before your last fall flow. It doesn’t take much for them to fill the other 2 frames up and be ready for winter.
I think you might run into difficulties trying to overwinter with queen excluders. The bees will migrate to the one queen and the others will die.
I am thinking about making mating nucs by dividing a med depth super. Three frames on each side, queen excluders, then a feeder and two frames in the middle. So each nuc would have three frames and there would be two frrames and a feeder in the “common area”. Any ideas?
Thanks, Neil
Hi Neal,
I’m not sure what your trying to accomplish with the common area. Seems like it just adds to the expense of the nuc and gives more chances of things going awry, especially since a virgin queen can go thru an excluder.
I use deep mating nucs that are split into four 2-frame units and have good results with them. Plans can be found in downloads
Since your using mediums, if it where me, I would take that center area and make a 3rd nuc out of it. I know Dave Miska, one of the largest queen breeders in the US, uses three 3-frame medium mating nucs.
Good luck,
Rob….
Hello Robo,
Sounds like we are using similiar methods of queen rearing. I am in the conclusion phase of the first attempt and I have several questions!
First, I could not see any eggs the first day, so I left the queen in Nicot box for 4 days until I saw the first of the royal jelly, then moved the cells to the cell builder hive. All seemed to go well . According to my calendar, I moved the cells to the mating nucs (same as your design). There are two problems: First, some of my cells were too large to place a queen protector cage over. These cells were distroyed by the bees in the first day. Second, I opened up the queen cell cage on the others and on the 19th day, 10 cells had emerged, or the bees destroyed them, I do not know which, and 5 cells had not emerged and I closed up the cell cages.
The main question I have is, do you recommend keeping the queen protector cage on until the queens emerge?
Many thanks,
Buddy M.
There are two problems: First, some of my cells were too large to place a queen protector cage over. These cells were distroyed by the bees in the first day.
I do not use cell protectors, so can’t offer any advice on them. The only time I have had cells destroyed was by another queen.
Second, I opened up the queen cell cage on the others and on the 19th day, 10 cells had emerged, or the bees destroyed them, I do not know which, and 5 cells had not emerged and I closed up the cell cages.
It is easy to determine if a queen has hatched by the perfect circular hole in the bottom. It almost looks like someone took a paper hole punch and made it. If you catch it early enough, you will often see the flap or hanging chad still attached. Whereas, if the cells where destroyed, you will find the side of the cell opened up.
The main question I have is, do you recommend keeping the queen protector cage on until the queens emerge?
I’ve never found a need to use them so I don’t. Sounds like you may have an issue with other queens getting access to your cells. You need to make sure there are no swarm cells above the queen excluder or in the mating nucs when you put them together.
I have had no sucess with the nicot system by betterbee. It took several days to lay in the breeder box and when the queen was released, the eggs would be removed. I tried the system with several queens with the same results… No Larve produced. I had to graft larve into the cups myself, and had very good resuts with that! I had a Jenter system a long time ago and the queens loved to lay into that cage, even when she wasnt confined to it! The queens I tested refused to lay in the Nicot cage when left open, even though she layed all around it. Betterbee seems to be a great company and I am sure we will work something out.
How do you feed your mating nucs?
How do you feed your mating nucs?
In order of preference:
1) Give a frame of honey
2) Inverted syrup jar in lid
3) Pour syrup into empty comb
Hi Robo–
So I am trying the Nicot system for the first time. Today I transferred the queen into the Nicot frame and replaced front and back covers, then inserted frame next to brood frames in middle of the hive. Here are my questions: Do I check each day until I see she had filled the cups with eggs, release her and leave off covers for nurse bees, then wait 4 days, then transfer cups with larvae to the cup holder bar, place in cell builder hive for 5 or 6 more days, then put on cell protectors, then transfer each one to separate queen castle chamber with a couple of frames, or to a new nuc.
Is this timing correct.
Thanks,
Ian
@Ian,
Yes, you want to check back every day after confining the queen to the Nicot box. Once she lays, then adjust your Calendar. Once the cells are capped, you don’t wat to move them until day 13 or later. If moved earlier, you can damage the development of her wings if there is any jarring. Also checkout the podcast section, there is a podcast and power point on small scale queen rearing using the Nicot system.
Robo,
I plan on using medium frames to create queens with the Nicot board. The reason is that I have been switching to mediums. My best queen is in a deep brood box but it has a medium above it. I will probably have to pull a few frames from other hives to build the proper sequence of frames. I made up 2 medium cell bars, 20 cups total. I only have one cloake board at this time. Can I put 2 medium frames in one hive or should I make up another cloake board and put them in 2 different hives? I’m in N FL and my (13) hives are building fast. Hives have lots of drones in them. I have one new hive that was a swarm 2 weeks ago, it also had drones in it. So I will need to split my hives soon. I am hoping to have queens ready. This is my first attempt at raising queens.
Thanks in advance.
Jim
@Jim,
20 cells is not unreasonable for a cell builder if you make it nice and strong. Most deep cell bar frames have at least 20 cell cups.
Rob…
Hi Robo,
I am using Dadant hives. Could you give me some informations about how to make the starter ? I’m using a cloake board.
Do I have to put a second box with frames (“extra frames with no bees” like slide 26 on your .pdf file) ?
wich sort of frames ? new ones ?
Thank you very much in advance
Renaud
(sorry for my english, i’m writing you from France)
Renaud,
The second box with frames is not necessary. It is just an option to do with the remaining frames from the cell builder. You want a really strong hive for the cell builder with lots of bees. A three box Langstroth hive is ideal. You can accomplish the same with a two box Dadant hive. No problem with your English, it is much better than my French 😉
Hello,
I am having a problem with the bees removing the eggs in the nicot box prior to day four. Any suggestions? Thanks
Bernie,
Make sure the Nicot box is in the middle of the brood chamber with plenty of open brood on both sides of it. Also make sure that there is room for nectar storage. I have seen them remove the eggs and store nectar in the cells when the hive was congested.
Have the downloads wandered elsewhere? Looking for the calendar…
Link updated. Thanks for pointing it out.