
Queen Introduction using a Double Screen Board
My preferred method of queen introduction is with the use of a double screened board. The advantage of this method is, unlike most other methods, you always have the original queen to fall back on if your new queen is not accepted or a poor quality layer.
 First lets start with a few definitions that will be used throughout. A double screen board is a “simple” design that has one fixed entrance for the top hive and no entrance for the bottom hive. These are easier to build and work perfectly fine for queen introduction, making splits, queen rearing and vented tops for swarm catching. A Snellgrove board is a more “complicated” design that allows for entrances on all four sides for both the top and bottom hives. It’s one advantage over the “simple” design is that you can control and move entrances which is needed to support Snellgrove’s method of swarm prevention. I’ll save that discussion for another time, but the main principle is to keep redirecting new field bees to the lower hive. The first thing to do is locate the old queen in the hive. This is yet another good reason for using marked queens. If you are not using a marked queen, I would suggest putting a queen excluder in the middle of the brood chamber a few days ahead of time. This will reduce the area you need to search for her (look to see which side of the exclude has new eggs) or in the worst case, if you can not find her, you will know not to take any frames from the side of the excluder that has eggs.
Once you have located the old queen, set her aside. Now create an “introduction nuc” by placing 3 frames of brood (covered with bees) in the center of an empty brood box, place a frame of pollen/honey on either side of the brood and fill the remainder of the box with empty combs. 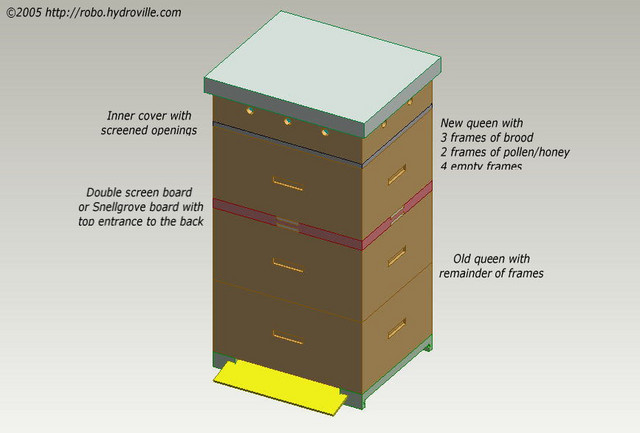 Next reassemble the remainder of the hive with the old queen, but instead of putting on the inner cover, ventilation box (if used) and top cover, place the double screen board on with the entrance up and to the rear of the hive. On top of the double screen board place the “introduction nuc” and install the new caged queen with cork removed from the candy end. Finish off with the inner cover, inverted jar feeder, ventilation box(if used) or empty super (to cover the feeder), and top cover. If you do use a ventilation box, make sure the openings in the inner cover are screened off temporarily. I find that if you allow access to the ventilation box, many of the bees will congregate on the screen inside the ventilation box while seeking for an entrance/exit.
The older (field bees) will return to the bottom hive through the normal entrance leaving just the younger bees in the “introduction nuc”. This is another positive, since younger bees are more likely to accept a new queen.
Now wait 3 or so days and then do a quick inspection to make sure the queen was released. You shouldn’t have to use smoke because you have been feeding and the bees should be happy! If the queen is still in the cage, release her. Leave them alone for another week and then check back for eggs and larvae.
If your new queen is not accepted, or she is a dud and you are not happy with her, just remove her and the double screen board to restore the hive. At this point you are no worse off than when you started, and have avoided the headaches of a requeening going bad and being left queenless.
Once you are happy with the performance of your new queen, simply find and remove the old queen from below and remove the double screen board.
It’s rather awesome,I have been searching materials relate to these stuffs for my paper.and it really helps me.
Thanks Robo, this should help introduce russian queen to italian hive which is risky business otherwise
Atacon, Try using a push-in cage method for your inter-racial introduction. Better odds.
Can we just remove the double screen board, let the yonger queen kill the old one? That will be easier not to find the old queen again which you know some unlucky time will be 1 or 2 hours.
dennis,
The only way to guarantee the old queen is the one killed is to do it yourself.
Rob: After the new queen is settled and laying, then you say “remove” the old queen and the DSB. Are you implying that no waiting period and newspaper merge is required?
Scott,
That is correct, nothing special needs to be done. The double screen board has allowed her pheromones to permeate the hive, so they will not see her as a strange queen.